Getting chicken breast right is one of those things that sounds straightforward until it isn’t. Dry, rubbery, flavorless — most people have been there at least once, usually more. The air fryer changes that equation in a way that’s hard to fully appreciate until you try it for yourself.
This recipe uses a spice rub built around smoked paprika, Italian seasoning, and a touch of brown sugar. The result is chicken that’s golden on the outside, genuinely juicy on the inside, and seasoned well enough to carry a meal without needing a complicated sauce alongside it.
The Problem With Chicken Breast (and the Fix)
Chicken breast has a reputation as the reliable, boring choice — and that reputation exists for a reason. It’s lean, which means there’s very little fat to protect it from heat. Cook it a minute or two too long and the moisture is gone, and no amount of sauce can fully bring it back.
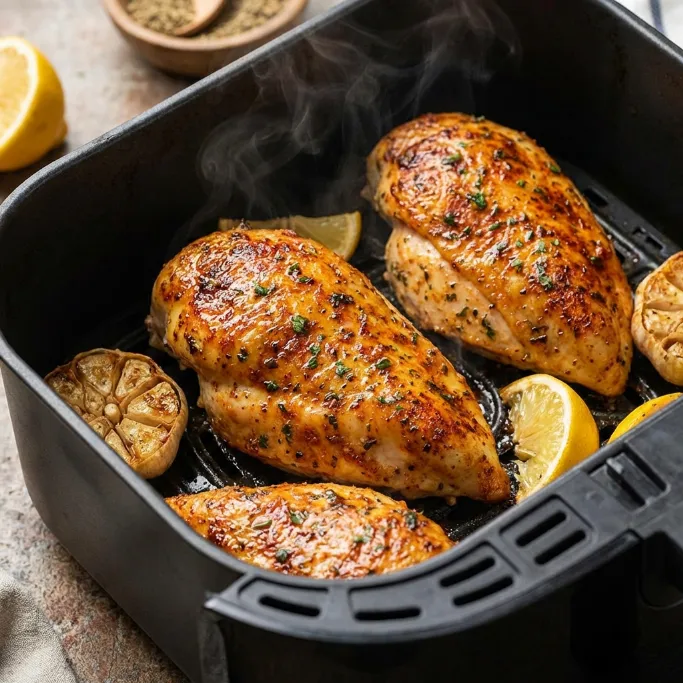
The air fryer addresses this partly through speed and partly through consistency. At 360°F, the circulating heat moves around the chicken from all sides, cooking it through more evenly than a pan or oven typically does. The outside gets that light, golden-brown color while the inside stays moist. It’s not magic — it’s just a method that happens to suit chicken breast particularly well.
Butter is the other variable worth mentioning. Brushing melted butter over the chicken before the spice rub goes on keeps the surface from drying out during cooking and gives the seasoning something to grip. Olive oil works too if that’s what you have, but butter adds a richness to the finished crust that makes a quiet but noticeable difference.
What Makes the Spice Rub Work
The blend in this recipe covers a lot of ground. Smoked paprika brings warmth and a subtle smokiness that makes the chicken taste like it was cooked over something more interesting than a kitchen appliance. Italian seasoning adds herbs — oregano, basil, thyme — that round out the flavor with a familiar, inviting quality.
The brown sugar is the quiet star. It caramelizes lightly against the heat, turning the surface of the chicken a deeper amber color and adding just a hint of sweetness that balances the saltiness of the kosher salt. Garlic powder and onion powder sit in the background, doing the savory work without announcing themselves. Black pepper brings a small but necessary bite at the end.
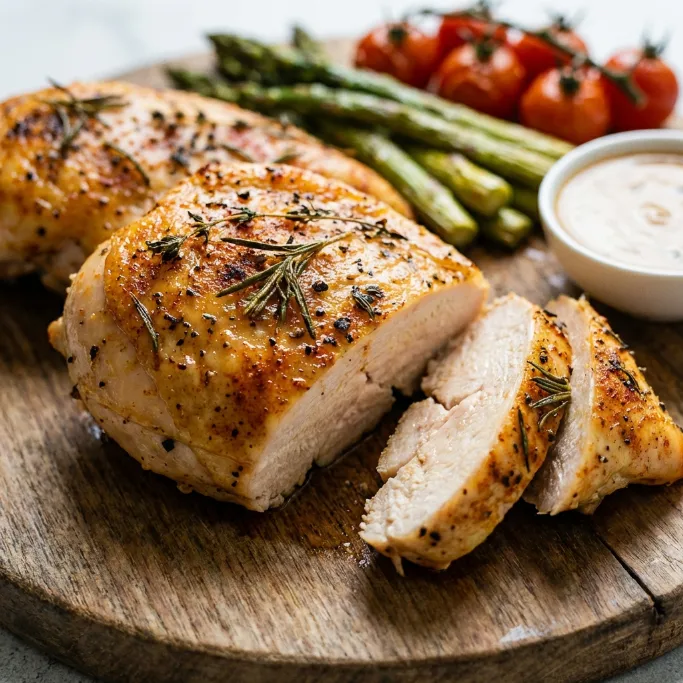
Chopped fresh parsley scattered over the finished chicken isn’t just decorative. The bright, herby freshness it adds contrasts nicely with the warmth of the spices, and it makes the plate look like it took more thought than a weeknight dinner usually does.
Making It at Home
Ingredients
- 4 boneless skinless chicken breasts, 6 ounces each
- 2 tablespoons butter or olive oil (melt the butter if using)
- 1 tablespoon brown sugar
- 1 teaspoon kosher salt
- 1 teaspoon Italian seasoning
- 1 teaspoon smoked paprika
- 1/4 teaspoon garlic powder
- 1/4 teaspoon onion powder
- 1/4 teaspoon black pepper
- 2 tablespoons chopped fresh parsley
- Cooking spray
Instructions
- Preheat the air fryer to 360°F.
- Brush the melted butter or olive oil across both sides of each chicken breast.
- Combine the brown sugar, salt, Italian seasoning, smoked paprika, garlic powder, onion powder, and black pepper in a small bowl. Mix until evenly blended.
- Rub the spice mixture all over both sides of the chicken, pressing it in gently so it adheres.
- Lightly coat the air fryer basket with cooking spray, then place the chicken breasts in a single layer.
- Cook at 360°F for 18 minutes total, flipping the chicken halfway through. The internal temperature should reach at least 165°F.
- Let the chicken rest for 5 minutes, then scatter the fresh parsley over the top and serve.
Tips for Getting It Right Every Time
Pound or slice thick breasts to an even thickness. Chicken breasts from the grocery store are often uneven — thick at one end, thin at the other. That taper means the thin end overcooks before the thick end is done. A quick few passes with a rolling pin, or simply butterflying the thickest part, gives you a more uniform piece that cooks evenly throughout.
Let the chicken come to room temperature before cooking. Cold chicken straight from the fridge takes longer to cook through, which means the outside spends more time under heat than necessary. Fifteen to twenty minutes on the counter before seasoning helps both doneness and texture.
Make extra spice blend. The seasoning mix stores well in a small jar at room temperature for up to a month. Having it ready means seasoned chicken takes about two minutes of actual effort on any given night.
Use a thermometer. 165°F is the target, and there’s no reliable way to hit it consistently without checking. The color of the outside and the clarity of the juices are useful clues, but neither is precise. A probe thermometer removes the guesswork entirely.
Common Mistakes Worth Avoiding
Cooking the chicken at too high a temperature is the most frequent issue. It might seem counterintuitive, but dropping the heat slightly — 360°F rather than 400°F — gives the interior more time to cook through before the outside over-crisps or dries out. Higher temperatures work well for things with more fat, like thighs. Chicken breast needs a gentler approach.
Skipping the rest time is the other one. Five minutes under a loose piece of foil after the chicken comes out lets the juices redistribute through the meat. Cut into it right away and they run straight to the cutting board. Wait five minutes and every slice stays moist through to the middle.
Variations to Try
The base recipe is flexible enough to shift direction depending on what sounds good.
For something with more heat, add a pinch of cayenne to the spice blend or a small amount of chili powder alongside the smoked paprika. It stays warm rather than hot, but brings more energy to the flavor.
For a Mediterranean lean, replace the Italian seasoning with dried oregano and add a teaspoon of lemon zest to the spice mix before rubbing. The brightness it adds pairs especially well with the smoked paprika.
For a slightly sweeter, more caramelized result, increase the brown sugar to one and a half tablespoons. The exterior develops a deeper color and a more noticeable sweetness that works well served over a grain or alongside roasted sweet potatoes.
How Chicken Size Affects the Timing
Six-ounce breasts at 360°F land right at 18 minutes total with a flip halfway through. If you’re working with larger breasts closer to 8 or 9 ounces, plan on 20 to 22 minutes and start checking the temperature at 18. For smaller breasts in the 4 to 5 ounce range, 14 to 16 minutes is usually enough.
Different air fryer models can run warmer or cooler than their displays suggest, especially older units. If your chicken has been consistently coming out dry even at 18 minutes, try pulling it at 165°F and see if that makes a difference regardless of time. The thermometer is always the more reliable guide.
What to Serve It With
This chicken is genuinely versatile. It sits well next to pasta with a light olive oil sauce, where the seasoned crust adds flavor without competing. Over rice with something green on the side — green beans, asparagus, or a simple salad — it makes a complete, balanced plate that feels like an intentional dinner rather than a fallback.
Sliced thin, it works well in wraps or grain bowls the next day. The smoked paprika and brown sugar crust holds its flavor even after a night in the fridge, which makes it one of the better meal prep options for the week.
Storing and Reheating
Leftovers keep in an airtight container in the refrigerator for up to four days. For reheating, the air fryer at 350°F for 3 to 4 minutes is the best route — it warms the chicken through without pushing it further toward dry. If the breasts are whole, slice them before reheating for faster, more even warming.
Chicken breast doesn’t freeze quite as beautifully as fattier cuts, but it can be frozen in an airtight container for up to three months. Thaw overnight in the fridge and reheat gently for best results.
FAQ
Can I use bone-in chicken breasts instead of boneless?
You can, but the timing changes significantly. Bone-in breasts take longer to cook through — closer to 25 to 30 minutes depending on size — and you’ll want to increase the temperature slightly to 375°F to make sure the skin gets enough color. The method is the same; just adjust the time and check the internal temperature rather than relying on the boneless timing in this recipe.
Why is my chicken coming out dry even when I follow the recipe?
A few things can cause this. First, the thickness of the breasts matters — very large, uneven breasts will cook unevenly, and the thinner portions dry out before the thicker end reaches 165°F. Pounding them to a more even thickness before cooking solves this. Second, resting time is non-negotiable. If you’re slicing into the chicken immediately after it comes out, the juices haven’t had time to settle back into the meat. Five minutes of resting makes a measurable difference.
Can I make the spice rub ahead of time?
Absolutely, and it’s worth doing. Mix a larger batch of the dry spices — everything except the butter or oil — and store it in a sealed jar at room temperature. It stays fresh for about a month. On a busy night, having the seasoning already made cuts the prep down to almost nothing.
Does this recipe work with chicken tenders or cutlets?
It works well with both, just at a shorter cook time. Chicken cutlets (thin-sliced breasts) typically take 10 to 12 minutes at the same temperature, and tenders take around 8 to 10 minutes depending on their size. Start checking the internal temperature at the lower end of those ranges and pull them as soon as they hit 165°F.
A Thought Before You Go
Chicken breast gets underestimated. It’s been the default “healthy but boring” protein for so long that it’s easy to overlook how good it can actually be when the method is right. This recipe doesn’t reinvent anything — it just removes the obstacles that usually stand between you and a plate of chicken that’s genuinely worth eating. Once it becomes part of the regular rotation, dry chicken starts feeling like a problem that used to exist.
Air Fryer Chicken Breast
Ingredients
Method
- Heat the air fryer to 360 degrees F.
- Brush the butter or olive oil all over both sides of the chicken.
- Add the brown sugar, salt, Italian seasoning, smoked paprika, garlic powder, onion powder and black pepper to a small bowl. Mix well.
- Rub the spice mixture all over both sides of the chicken.
- Place the chicken in a single layer in the air fryer. Bake the chicken for 18 minutes, flipping halfway through, or until a thermometer inserted into a chicken breast registers at least 165 degrees F.
- Let stand for 5 minutes, then sprinkle with parsley and serve.